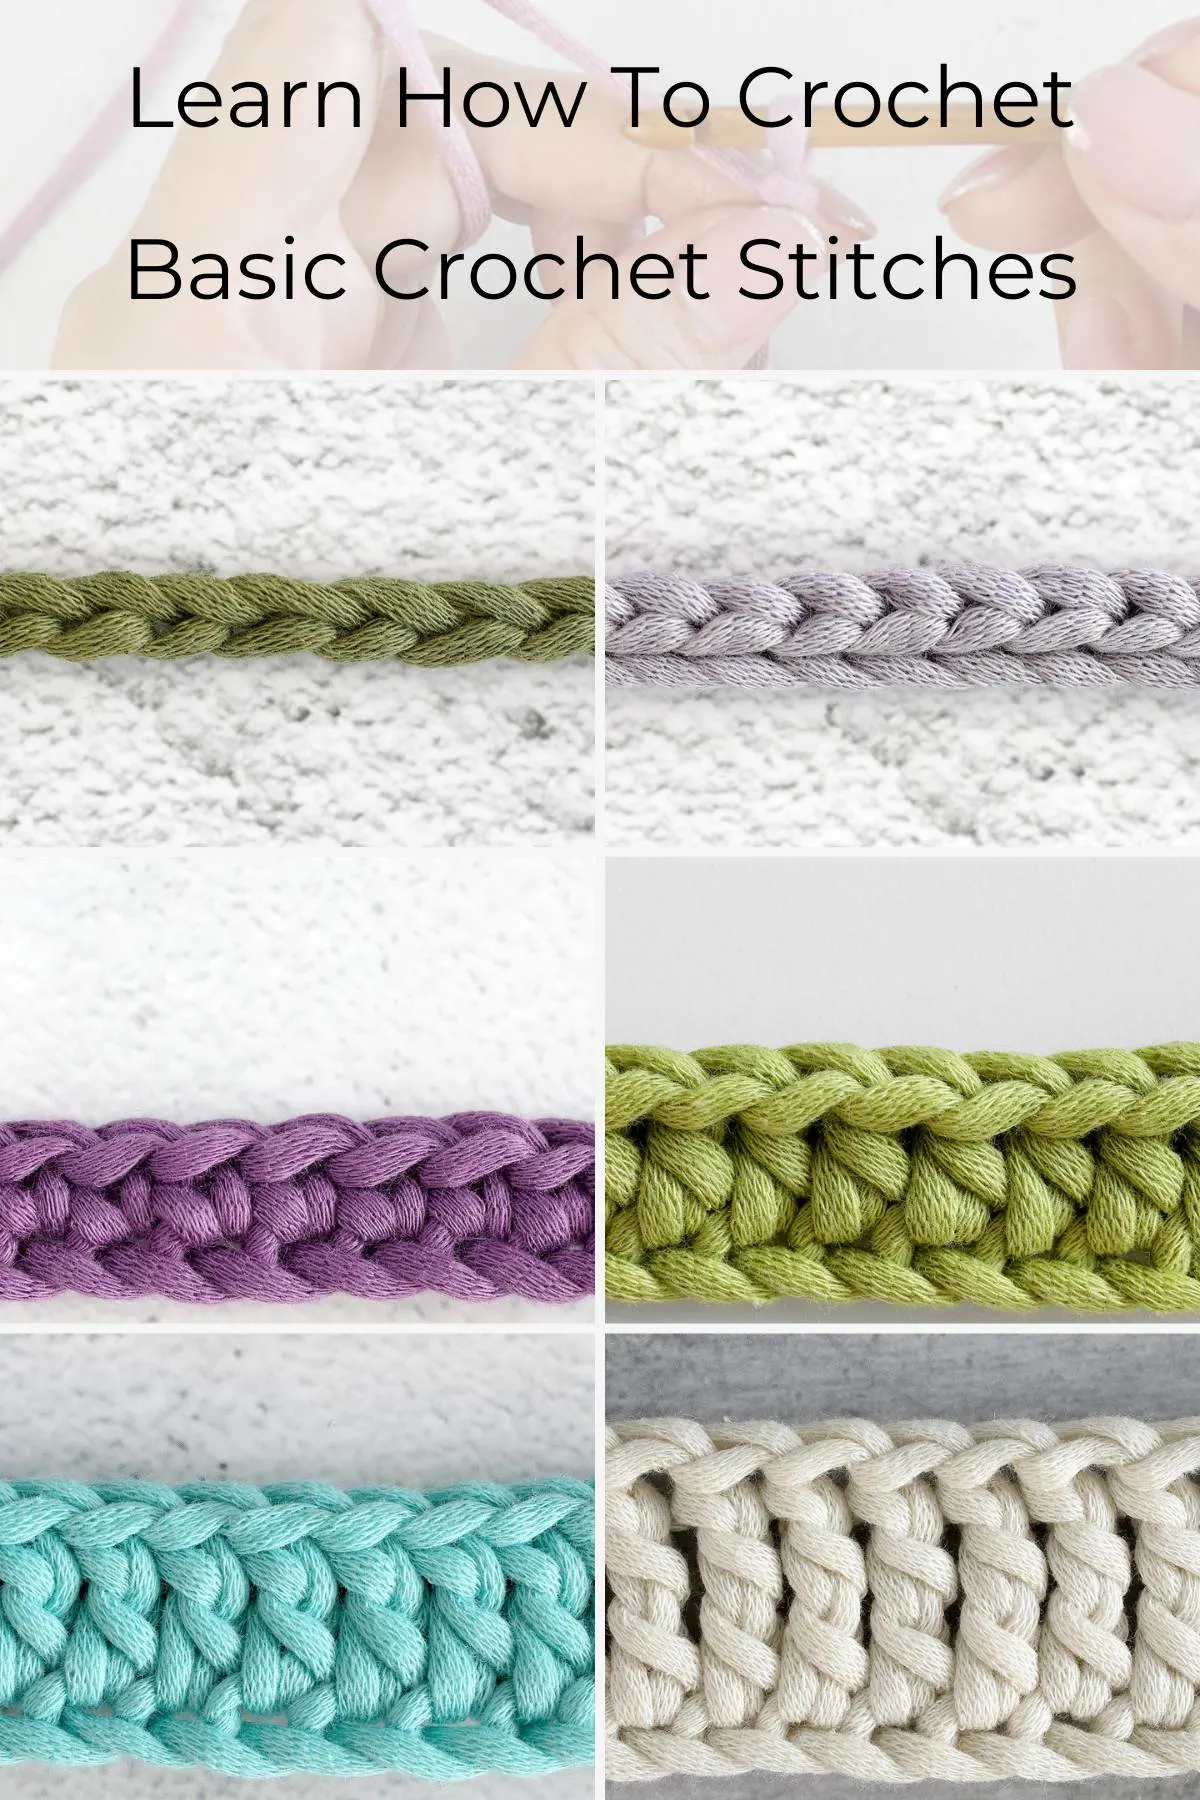
Welcome to our easy-breezy guide to mastering the six basic crochet stitches! Designed with ease and simplicity in mind, this how-to crochet tutorial is perfect for both beginners and those looking to refresh their skills. Crochet is not just a craft; it’s a creative journey that brings immense satisfaction and a sense of accomplishment.
In this guide, we’ll walk you through these easy crochet stitches step-by-step, ensuring that you can follow along at your own pace. From the foundational chain stitch to the elegant treble crochet, we’ll equip you with all the skills you need to create your own beautiful, handmade projects. So, grab your crochet hook and some yarn, and let’s turn those crochet dreams into reality!

Six Basic Crochet Stitches
Before we get on to the tutorials that will show you how to crochet these common crochet stitches, let’s take a closer look at what these crochet stitches are.
The six basic crochet stitches listed below are the basic building blocks for a vast array of crochet patterns and designs:
- Chain Stitch (ch)
- Slip Stitch (sl st)
- Single Crochet (sc)
- Half Double Crochet (hdc)
- Double Crochet (dc)
- Treble Crochet (tr)
Note: The tutorial is based on US crochet terms and abbreviations, and it is demonstrated using the right hand. You may refer to this conversion guide for UK crochet terms.
Gather Your First Supplies
Before you are able to cast the first crochet stitch, let’s gather the crochet supplies. For beginners, the essential items include:
- Yarn
Yarn choice is equally important, with medium-weight (worsted) yarn being a great choice for starters due to its versatility and ease of use. - Crochet hook
Crochet hooks come in various sizes, and it’s often recommended to start with a size H-8 (5mm) hook, which is comfortable for beginners to handle. Learn more about crochet hooks and sizes. - Scissors.
A pair of scissors is needed for cutting the yarn. - Other Supplies
- Tapestry Needle or Yarn Needle – a beginner might find a yarn needle useful for weaving in ends.
- Stitch Markers – to make the important crochet stitches in your work, especially the first stitch of the round and places where you need to perform some special stitches.
- Beginner’s Guide
A guide to how to crochet for beginners can provide helpful instructions and inspiration. As skills develop, crocheters can explore more diverse yarns, hooks of different sizes, different techniques, and some abbreviations of the crochet terms.
Getting Started
Here are a few essential steps to follow after gathering your crochet supplies before you can actually learn how to crochet stitches:
- Practice Holding the Hook and Yarn
There are different ways to hold a crochet hook – like a pencil or a knife. Experiment to find the most comfortable grip for you. Similarly, learn to hold the yarn in a way that allows you to control the tension. Read more on how to hold yarn and crochet hooks in different ways. - Create a Slip Knot
This is usually the first step in beginning a crochet project. Learn several techniques for tying a slip knot to attach the yarn to your crochet hook.
Now that we’ve covered the fundamentals of the basics, let’s move on to learn these important crochet stitches.
How To Crochet Chain Stitch
Chain stitch (abbreviated as ch) serves as the foundation of many crochet projects and is often the starting base for building your project. While it may seem like a simple stitch, don’t underestimate its power to add versatility and finesse to your projects.
This stitch is versatile and can be used in various ways, from creating a simple foundation chain to adding length and spaces between other types of crochet stitches.

The chain stitch is created by:
- Wrap the yarn over the hook; we called this “yarn over”, abbreviated as YO.
- Pull the loop of the wrapping yarn through the existing loop on your crochet hook, creating a chain stitch.
- Repeat to create more chain stitches.
One common use of the chain stitch is to create a starting chain for a project. This chain forms the base upon which subsequent rows and stitches are built. The length of the starting chain will determine the width of your project, so it’s essential to follow the pattern instructions carefully.
Chain stitches can also be used to create spaces or decorative elements within a crochet design. By skipping a certain number of chain stitches before working into the next stitch, you can create an openwork effect, perfect for lace patterns or lightweight garments. Additionally, you can add beads or other embellishments by incorporating them into the chain stitches themselves.
Learn more about Chain Stitch (ch) with the following details:
How To Crochet Slip Stitch
The slip stitch (abbreviated as sl st) is commonly used to join rounds, create decorative edges, or make smooth transitions between different parts of your crochet work. This stitch is incredibly flexible and can be used in various ways to achieve different effects.
It’s important to note that slip stitches are usually worked loosely, allowing for a bit of stretch and flexibility in your finished piece.

To execute a slip stitch:
- Insert your hook into the designated stitch or space, yarn over.
- Draw the yarn through both the stitch and the loop on your hook.
- Repeat to create more slip stitches.
One of the most common uses of the sl st is to join rounds in a circular project, such as a hat or a granny square. After completing the last stitch of one round, you can use this crochet stitch to seamlessly connect it to the first stitch of the next round. This technique creates a smooth and continuous look, eliminating any noticeable gaps or seams.
In addition to joining rounds, slip stitches are also handy for creating decorative edges. By working slip stitches along the edges of your project, you can achieve a neat and polished finish. This technique is often used in blankets, scarves, or garments, where a clean edge can make all the difference.
Another creative way to incorporate slip stitches into your crochet repertoire is by using them to create colorwork or texture. By strategically inserting slip stitches in specific stitches or spaces, you can add intricate patterns or raised textures to your projects. This technique can truly elevate your crochet work and leave a lasting impression.
Learn more about Slip Stitch (sl st) with the following details:
How To Single Crochet
Single crochet stitch (abbreviated as sc) is a fundamental stitch in crochet that is used to create a dense, sturdy fabric. It is often the stitch of choice for amigurumi projects or any design that requires a tight, solid structure.
The beauty of the single crochet stitch lies in its simplicity and versatility. Depending on the number of stitches and rows, you can create a wide range of textures and patterns. By changing the hook size and yarn weight, you can also play with the overall look and drape of your finished project.

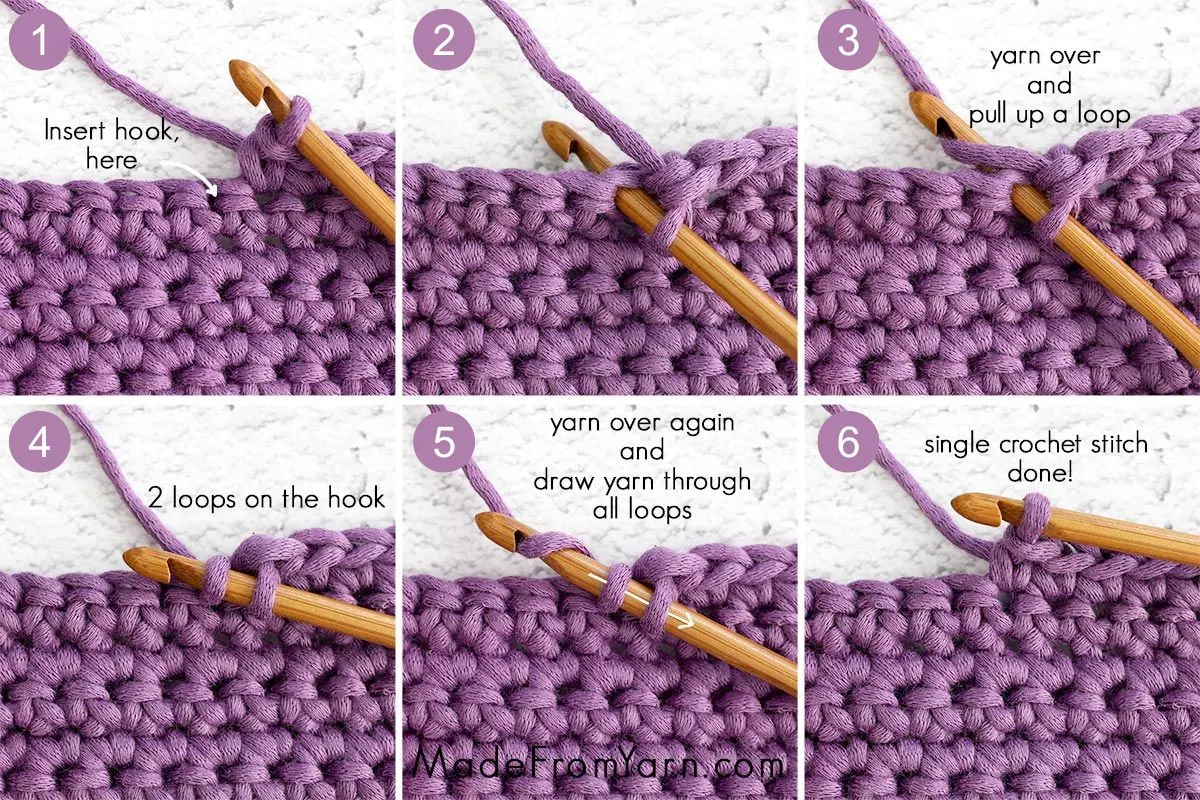
To work a single crochet stitch:
- Inserting your hook into the designated stitch or space.
- Yarn Over,
- Pull through a loop,
- Creating two loops on your hook.
- Yarn over again and pull through both loops, completing the single crochet stitch.
- Repeat these steps across the row to make more sc stitches.
The single crochet stitch is often used as a foundation for more complex stitches and techniques. Its tight structure provides stability and acts as a solid base for building. This makes it a crucial stitch to master before venturing into more intricate crochet patterns.
Single crochet stitches can be used alone or combined with different crochet stitches to create various cool designs. We added a link about this variation below (item 4). You may explore it later after you have mastered the Single Crochet Stitches.
Learn more about Single Crochet (sc) with the following details:
How To Half Double Crochet
The Half Double crochet (abbreviated as hdc), like the single crochet, is one of the basic crochet stitches that you’ll want to add to your repertoire. It’s a versatile stitch that can be used in a variety of projects, from blankets to scarves to hats.
What sets the hdc stitch apart from the single crochet stitch is the height of the stitch. With a bit more height, the hdc creates a slightly looser and more airy fabric. This can be beneficial when you want a project with a bit more drape or a lighter weight.

To create the Half Double Crochet:
- Begin by yarn over.
- Insert your hook into the next stitch.
- Yarn over again and pull the yarn through the stitch,
- Creating three loops on your hook.
- Yarn over once more and pull through all three loops to complete the stitch.
- Repeat to make more hdc stitches.
Just like the single crochet stitch, mastering the hdc stitch will provide you with a solid foundation for more complex stitches and techniques. By understanding and becoming proficient in these basic stitches, you’ll be better equipped to tackle more intricate crochet patterns with confidence.
Learn more about Half Double Crochet (hdc) with the following details:
How To Double Crochet
Double Crochet stitches (abbreviated as dc) are commonly used when you want a looser and drapey fabric, such as in shawls, blankets, or lightweight garments. They can also be used to create decorative elements, like lace patterns or intricate stitch designs.
The double crochet stitch is slightly taller than the half double crochet stitch, and it creates a more open and lacy fabric.

Here is how to make a Double Crochet stitch:
- Begin by yarn over.
- Insert your hook into the stitch or space where you want to place the double crochet stitch. Yarn over again.
- Pull up a loop. Now you have 3 loops on your hook.
- Yarn over again and pull through two loops on your hook.
- Repeat step 4 one more time to complete a dc stitch.
- Repeat steps 1 to 5 to create more dc stitches.
With the double crochet stitch in your skillset, you’ll be able to tackle a wider range of projects, such as granny squares, and add more intricate details to your work. Whether you’re creating a delicate lace tablecloth or a cozy afghan, the double crochet stitches offer you the flexibility to adapt and design to your heart’s content.
Learn more about Double Crochet (dc) with the following details:
How To Treble Crochet
The treble crochet stitch (abbreviated as tr) is the tallest stitch among the six basic crochet stitches, which adds a beautiful texture to your work.
It consists of wrapping the yarn around the hook twice before inserting it into the stitch. This extra wrap creates a taller crochet stitch with more open spaces, making it perfect for creating lacy patterns and delicate designs.

To make a treble crochet stitch:
- Begin by yarn over twice. Insert your hook into the designated stitch.
- Yarn over and pull up a loop
- There will be four loops on the hook.
- Yarn over and draw through the first two loops.
- The hook will have 3 loops now.
- Yarn over once more and draw through another two loops.
- The hook now will have two loops.
- Yarn over one last time and pull through the remaining two loops. Completing your treble crochet stitch.
- Repeat to make more tr stitches.
One of the great things about the treble crochet stitches is its versatility. You can use it to create lacy openwork patterns for shawls, scarves, or doilies, or you can stack multiple treble crochet stitches together for a dense, textured fabric perfect for blankets or sweaters. With the treble crochet in your repertoire, the possibilities are endless.
Learn more about Treble Crochet (tr) with the following details:
What’s next after this basic crochet stitches tutorial?
What’s next after learning treble crochet stitches? There are some taller stitches after tr, and they are created by yarn over (YO) more times before inserting the hook into the stitch and then yarning over and pulling through two loops on the hook repeatedly until only one loop remains. This stitch creates a taller and more flexible fabric. Learn more about these taller crochet stitches.
I hope you will find learning crochet stitches easy and useful. If you haven’t taken out your yarn and crochet hook to start practicing, get them now. Explore more and try out some beginner’s crochet projects to sharpen your skill in the journey of crocheting.
- Practice these basic stitches and master them. Remember, practice makes perfect!
- Browse to get more free crochet patterns when you are ready to embark on more crochet projects.
- Recommend your friends to join in the fun of crocheting by learning these basic crochet stitches.
- Share your crochet project on your social media Facebook and/or Instagram, and show them to us by tagging @madefromyarn.
- Pin it to Pinterest for later reference.

Sarah
Monday 1st of April 2024
Thank you so much for such a clear, concise, and well organised introduction to crochet. I'm so glad I found your website, and am looking forward to exploring some of your free patterns so I can continue practicing the basic stitches you've just taught me.
Made From Yarn
Tuesday 2nd of April 2024
Welcome to the world of crochet, Sarah! We will post more crochet tutorials and hope that they are helpful for all the beginners on this journey.